Mobile App Optimization
What the blog is about
Flutter apps are often performant by default, but it’s fairly typical to become trapped with everyday activities in Flutter App development. When creating a new Flutter project, it’s worth paying attention to several aspects, such as tooling, packages, file structure, state management solution, or testing plan. It is also important to start smartly with these decisions because they will have an impact on the future of your large project.
Code Analysis Tool

First of all, we will need a code analysis tool that will signal inaccuracies that require improvement in the code. Such a tool will help us keep the coding clean and remove a large number of programming errors. Currently, there are many optimizations for such tools that may be present in our code, however, I would recommend using one of the following kits due to compliance with best practices based on the Dart programming language Style Guide:
- lint.
- flutter_lints.
In both packages, you can optimize settings for your code in the analysis_options.yaml file.
Sorting structure of files in the project

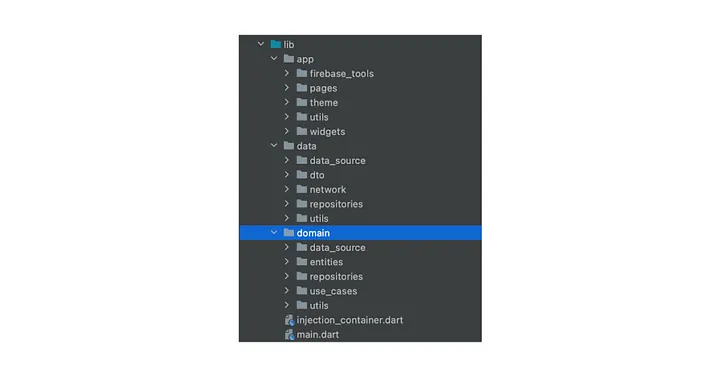
To maintain cleanliness and facilitate navigation inside the project for all Flutter developers, it’s recommended to create an appropriate folder structure. It should contain code files such as application pages, widgets, classes, files for the state management, themes, utils, domain, data in several places, just like in the picture below:
With that structure every Flutter developer can easily find what he or she needs from the codebase.
Separate environments for separate processes

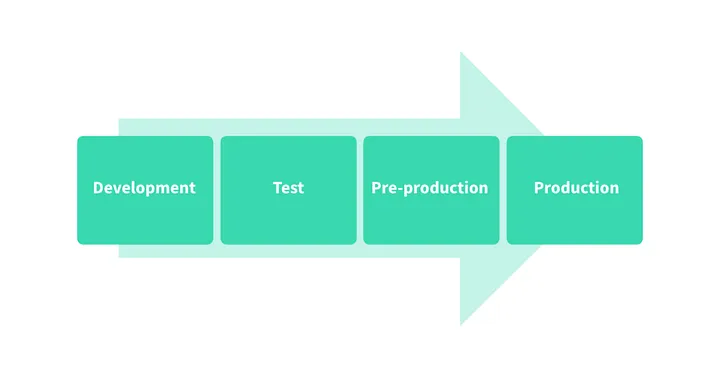
To avoid errors caused in the application’s production environment (which can have a significant impact on its quality and customer relations), we create individual environments that have an impact on each other after appropriate approval. The most common environments we create are development, staging, and production environment.
1. Development environment
This is the place where the programmer makes changes to the codebase and can freely experiment, remove or add new lines of code without worrying about it going to the production application. Even if someone makes mistakes here, it’s easy to roll back the code to its original state.
2. Staging environment
Is an intermediate environment between the development code and the production code. You can test, reject or accept changes that will be redirected to the production code. Code testing usually consists of creating a snapshot of production data and checking the functionality of the application with new changes. This way you can avoid “surprises” in the production code.
3. Production environment
This environment is used by real-time users. Corrupted data is not acceptable at this point. The following solutions may be useful to automate the processes of building, testing, and releasing an application:
- Appcircle
- Codemagic
- Bitrise
Crash recorder for your application
It is important to know when your application crashes and what is causing it. The more data you have about what is happening in your application at a given moment, the more you will be able to do. The following services come to the rescue:
- Sentry
- Firebase Crashlytics
- Datadog
With the help of these services, you will be able to record the most important data, crash reports, and activate notifications when something goes wrong with the application.
Users behavior analysis
What if we wanted to observe user behavior in our Flutter application? For example, what actions do they take when buying products, at what moments/pages do they stop using the application, and what problems do they encounter? Here help comes again from services such as:
- Firebase Analytics
- App Center Analytics
These provide an accurate map of users’ movement around our application, so that we can draw conclusions and improve certain functions for better efficiency of using the Flutter application.
README file
If you share applications with other developers or a Flutter team, you should create a readme file that will contain all commands for generating, testing, running the code and various decisions about the file structure, diagrams, external tools and services, information about various environments. It is much faster and nicer when the above information is always in one place, you do not need to search and ask your colleagues why the application is not working.
Rebuild only what you need to be rebuild
A common programming mistake is to rebuild widgets entirely with setState. In small applications this may not be a problem with functionality, but as the application grows it can cause big problems with its performance. The optimal method I use for my condition management applications is the Bloc system. Helps you manage status and share data from a central location in your project. BLoCs are objects that process and store business logic, use sinks to accept input, and provide output via streams. BLoC is a simple but powerful pattern to tame app state as it flies up and down the widget tree..
BLoC stands for Business Logic Controller. It was created by Google and introduced at Google I/O 2018. It is created based on Streams and Reactive Programming.
If you want to start creating mobile apps with the BLoC architecture I would strongly recommend two libraries that make working with it much easier: bloc and flutter_bloc. I would also recommend the official documentation of these libraries.
In the BLoC pattern, we can distinguish four main layers of application:
- UI
- BLoC
- Repository
- Data sources
It holds all the application’s components that are visible to the user and could be interacted with. Since in Flutter apps all parts of the User Interface are Widgets, we can say that all of them belong in this layer.
These are the classes that act as a layer between data and UI components. The BLoC listens to events passed from it, and after receiving a response, it emits an appropriate state.
It is responsible for fetching pieces of information from single or multiple data sources and processing it for the UI classes.
These are classes that provide the data for the application, from all the data sources, including the database, network, shared preferences, etc.
The BLoC pattern relies on two main components, presented below:
- Events that are passed from UI, which contain information about a specific action that has to be handled by the BLoC.
- States that show how the UI should react to change in data. Every BLoC has its initial state, which is defined upon creation.
Contact us
Innovate With Confidence
Join our community for the latest updates, insights on our innovations and queries on your project.
Reach out to us anytime for more information or support.


.png)

